$23.00
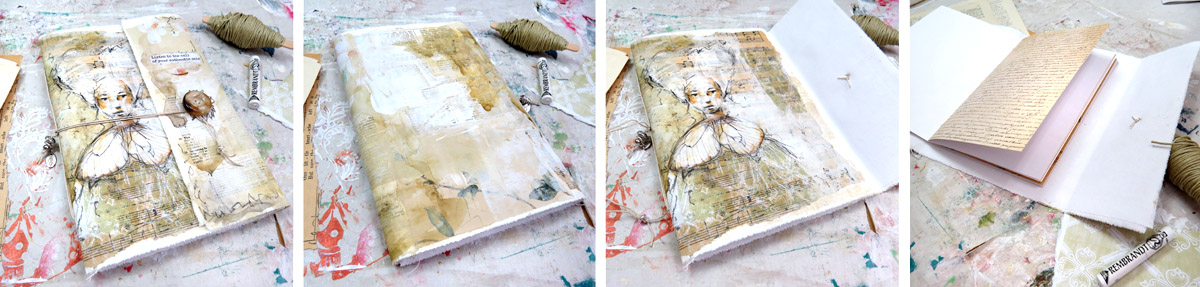
In this lesson you will be guided through the creation of this woodland faery and the assembly of the journal. This piece is a simple design on a base of fabric using collage, water based media, watersoluble graphite, and some white soft pastel. This is a very simple journal to make with minimal supplies required – fabric, string and beads!
Description
classroom is open!
This is an online self-study single mini-lesson that was filmed at my studio worktable.
I have created these short mini lessons as part of the “in my studio” online series. In them I invite you to follow along with me in a typical session in my day where I create a single artwork. I use varying techniques and materials.
The cost for this lesson is $23 US.
In this lesson you will be guided through the creation of this woodland faery and the assembly of the journal. This piece is a simple design on a base of fabric using collage, water based markers, inktense blocks (see below for alternatives), watersoluble graphite, and some white soft pastel. We will use an image transfer method on her dress. This is a very simple journal to make with minimal supplies required. You can easily customise it to your heart’s content!
You will learn all the techniques for preparing the fabric (simple cotton), collaging the background, sketching and colouring the faery using watersoluble graphite, and colouring with waterbased media.
You will receive around two hours of full-length video that will walk you step-by-step through the process of creating your journal. There is no fast-forward you will watch my entire process in real time.
The inside of the journal features two signatures (groups of pages), which you can customise with the paper of your choice – I use watercolour paper and scrapbook paper.
Who is this lesson for?
This is a beginners to intermediate lesson incorporating basic mixed media techniques and simple sketching. It is a work at your own pace lesson. You will gain access to two hours of video in which I walk you through various mixed media and sketching techniques and the construction of your journal (don’t worry it’s simple!).
This is an open ended workshop with no expiration date. Plus all the videos are downloadable and yours to keep!
What supplies will I need for the lesson?
Please use what you already have in your collection. The items below are what I have used in this lesson.
- Plain white/cream cotton fabric (old sheeting or calico) about 2 x 42x24cm (16×9.5″) pieces
- White gesso
- Gel medium – I use gloss and matte (liquitex or similar)
- Watersoluble colouring media
- Inktense blocks (or pencils) – these are ink based and watersoluble, you could also use watercolour pencils or neocolor/lyra watersoluble crayons
- Winsor and Newton watercolour markers – again as above you can substitute any water based marker or watercolour pencils.
- Medium round watercolour brush
- Vintage papers or scrapbook papers – eg. old letter or sheet music, old dress pattern – something neutral
- Paint brush for collaging
- Watersoluble Graphite pencils – I am using Derwent watersoluble graphite pencils medium and dark wash (you could also use Lyra or Faber Castel watersoluble grahite pencils/crayons)
- Graphite pencil 8b or 6b
- Brayer (I use a large and small one) any size will work
- Acrylic paint – white and a buff/cream (I use Jo Sonja Smoked Pearl and Tit. White)
- Old credit card or piece of plastic to smooth collage
- White soft pastel (or white charcoal)
- Satin finish spray sealer – Krylon or similar (optional)
- Paper for your signatures – you can make your journal as thick as you like by adjusting the number of paper sheets you use – I use 4 x A4 watercolour sheets and 4 x A4 scrapbook paper sheets, all folded in half to make an approximate A5 size journal
- String or cord 2 x 120cm long lengths and 1 x 30cm long length (I use hemp cord, you could use twine or any string you like)
- Sharp tool or nail to punch the holes in your paper and cover
- Large sewing or upholsterer’s needle – makes it a little easier to thread the string through the holes and button
- 1 Large button
- assorted small beads (optional)
- Non stick baking paper (to protect your worktop)
- Paper towel
Accessing your lesson
This class has immediate access. When you proceed through the checkout you will be asked to login (if you have previously purchased another class) or register (if this is your first class on this site). Following your purchase this class will appear in your My Courses page when you login under My Classroom in the website menu. You can always find your classes here https://www.toniburt.com.au/my-courses/
**Due to the nature of the immediate availability of this course, all online classes are non-refundable.
If you have any questions?
If you have any questions at all please contact me via the contact page. I will do my best to reply to your message within 24 hours. NB: I am located in Australia so there might be a little timezone difference!